Manchu Arrow Project (part 5)
Silent Thunder Ordnance
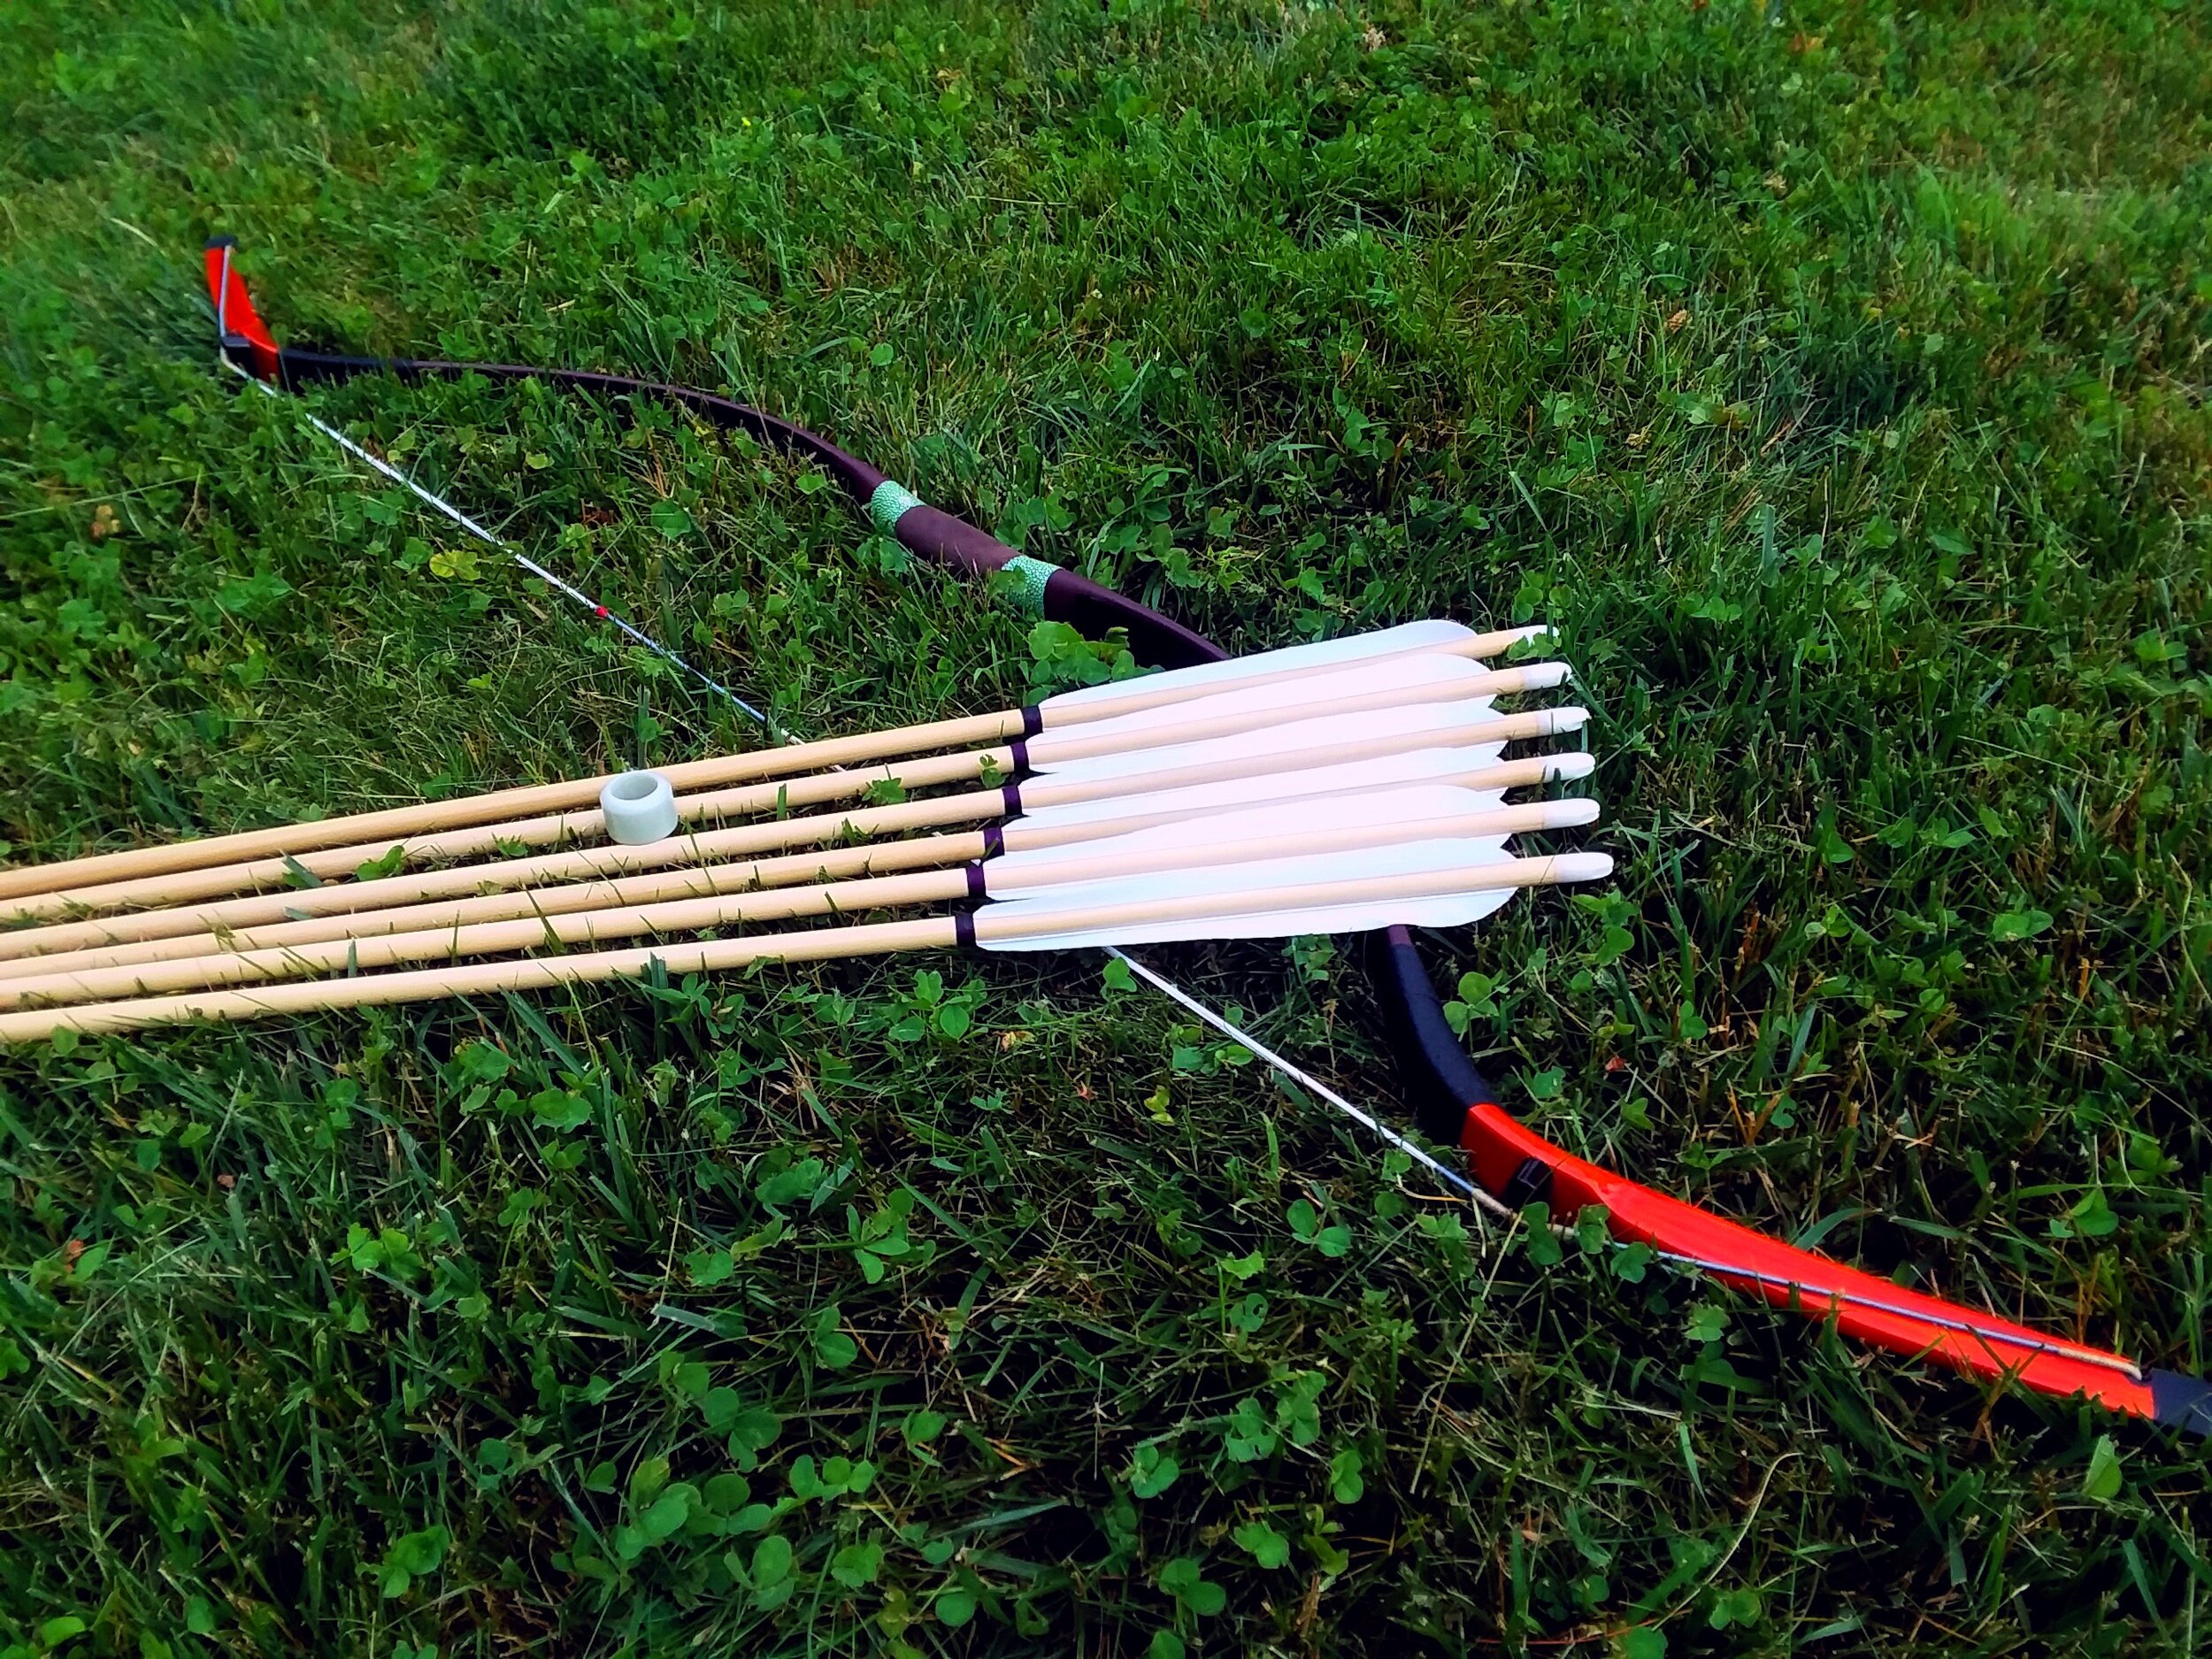
JZW Manchu Bow shown with one of our Manchu rings (thick) in GITD green (looks a lot like jade) and some of the ~1200 grain arrows from the previous episode of the Manchu Arrow Project.
In our previous episode (Manchu Arrow Project part 4) we finished some very nice war weight, 1200 grain, arrows for the beastly JZW Manchu bow. But it has been a couple years, and it is not only time for new arrows, it’d be nice to make somewhat more practical arrows. I also want to make this project accessible, whereby someone following along who owns no tools and lives in a small apartment could feasibly do this themselves, and do it for ideally less than the price of a dozen Gold Tip Traditional arrows. As I write this, I genuinely have no idea if that is possible, I have no idea if it can be done for even what two dozen Gold Tip Traditional arrows cost, but as I go through I’ll provide information on alternatives at a lower price so someone without any workshop or tools at all could get this done. At current, the price for Gold Tip Traditional arrows are 137$ per dozen fletched with inserts at 3Rivers. It is going to be really tough, maybe impossible, but that is the is the goal.
Before we get started though, what exactly was impractical about the old arrows? Well a number of things. First off, many ranges aren’t terribly thrilled for you to be punching 1/2” diameter holes in their targets. They’re not as bad to the targets as broadheads, but many if not most “self healing” targets are based around the idea of punching a very small hole around which the material simply stretches and then returns to shape when the arrow is withdrawn. This isn’t so much the case with a 1/2” diameter shaft, you leave stonking great holes in most foam targets (polyethylene) which another lucky, or unlucky as the case may be, arrow could find. Then there are quivers, most won’t happily take 1/2” shafts, and if they do they won’t take a full dozen. And then there is the interesting pickle of point of impact. This ~60# JZW Manchu isn’t powerful enough to flex these shafts as they pass around the bow, at least not to any significant degree. Heavier points might help, but lets be realistic, the arrows are war weight and the bow is not. This compounds with the fact that, at 1/2” diameter, the physical angle of the arrow with the string at rest is actually very different than that of a “normal” diameter arrow. The result? You have a POI shift. It is consistent and repeatable, but it makes switching from one bow to this one with these arrows quite challenging; your instinctive point of aim need change and that is not as simple as clicking a sight a couple mils left or right.
So the goal, to be completed (hopefully) over the next couple installments is to go over the process of making arrows of a more practical nature for this, or any, Manchu bow.** One might ask: why not just buy modern arrows? The problem is, this is not so easy. Sourcing shafting which is the full 38” in length is hard, weighting modern carbon arrows to meet the minimum mass requirements of a Manchu bow is not so easy, and getting arrows which are stiff enough is not so easy. Taken as a sum, this is one of the major challenges of Manchu bow ownership, particularly if you’re interested in the heavier draw weights.
And that leads conveniently to the first challenge: minimum required mass. The bow in question is a Jia Zhiwei (JZW) Manchu, which pulls ~60#s@35”. These are one of, if not the best, Manchu replicas on the market, possessing the aggressive forward siyah angle of the originals (most replicas lack this), a very smooth powerful draw, a full 36” draw length, good efficiency (for the style), good durability, and a lot of beautiful little detailing around the bow. To my dismay, in researching for this project, it appears both the European and American distributors of these fine bows have disappeared. ManchuBows.com in particular was a good resource, no longer available. Thankfully we saved a copy of the website, so should owners have questions in future, the relevant data on the bows can be seen in the gallery below.


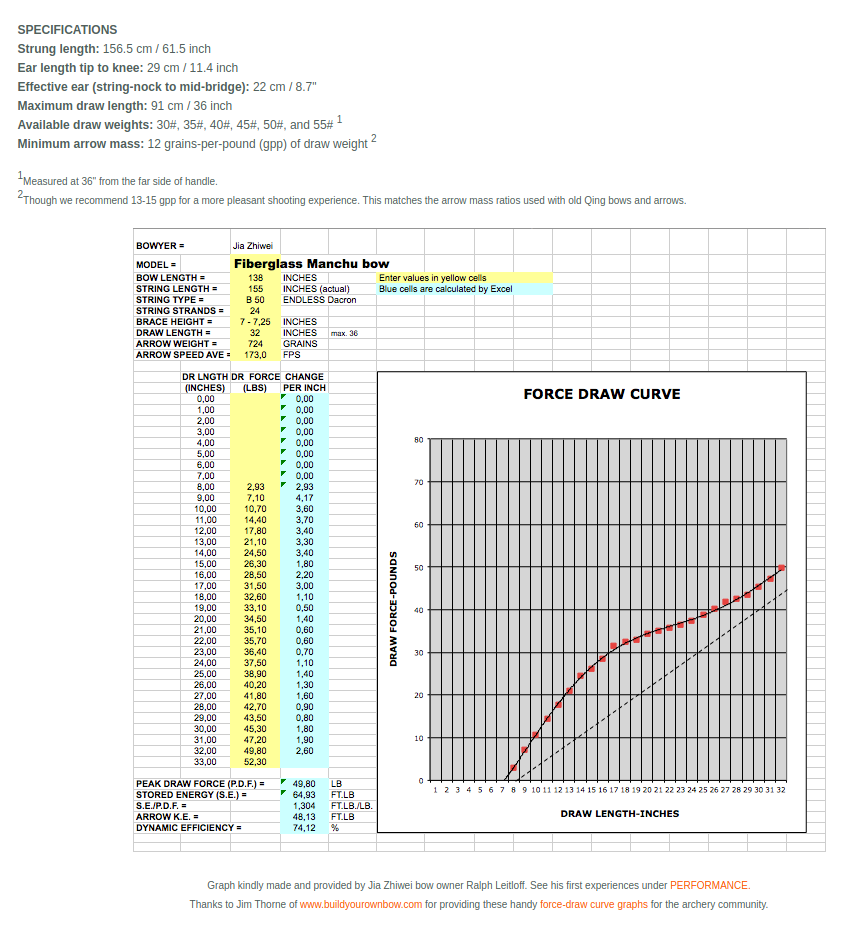


So there it is, in short, 12GPP (grains per pound) is the minimum, however the recommended range is 13-15 grains per pound. This is on the good-end of typical for modern reproductions of this style of bow. So that is 720 grains minimum, but 780-900 grains ideal.
A simple formula for the weight of an arrow in grains given the density of the wood (w) in kg/m^2, the length (l) in mm, and the diameter (d) in mm.
First stop on any project like this is a little napkin math, a back-of-the-pizza-box calculation to ensure this project will end up in the performance ballpark necessary before we begin. That starts with a wood density chart and total volume calculation. For reasons we’ll get into below, lets say our arrows are going to be 3/8” in diameter (9.5mm), and that they’ll be 38” in length (965mm). We all know the area of a circle is equal to pi*r^2, but for unit conversion reasons it is easier to convert from mm to meters so do that first. Then you get the cross sectional area, which is .000064 square meters. Multiply that by the length, and you get .000068 cubic meters. Then you need only convert from kilograms to grains (one gram is 15.43 grains) and there you have it. Confused yet? I put it all together into a simple equation so you can easily run the numbers yourself.
Circling back to the wood density chart, the most commonly available woods (available at your typical home-improvement stores) in North America that are straight grained, strong enough for arrows, and not obviously light softwoods are poplar, maple and red oak. Poplar was used on original Manchu arrows, and would result in a mass range of 370 to 530 grains. Not quite enough. Poplar does make great arrows I should note, quite robust, but not suitable density for this application. Most of the oak seen in home improvement stores is red oak, discernible by its very open grain structure. I’ve made arrows from it before, and while it works fine, this open grain is something to keep in mind it doesn’t always play nicely with dip tubes and prefers extra finishing steps to raise the grain and ensure you don’t get splinters later down the road. By the chart, it would produce arrows of 780 grains. This would work nicely. Maple is 650 to 790 grains. This will work nicely, and save the extra care of oak. You’ll notice all these numbers are at the low end, however keep in mind this is before we’ve added points, feathers, nocks, and finish. A thick dipped on lacquer can do a surprising amount to increase arrow mass, and points are easily had in excess of 100 grains. For this particular project in fact, I picked up 23/64” 190 grain steel field points, which at the time of writing are 8.50$ a dozen at 3Rivers. That combined with even the lowest density maple would easily get these arrows above the 720 grain minimum.
The next step is board selection. Don’t grab just any board, take a close look at the grain. Tighter grain tends to be denser, stronger, and you want nice straight grain with no knots or flaws. The level of knot/flaw/grain-crossing an arrow can tolerate is primarily determined by three things:
1) How much weight you put up front, both arrow length and point mass.
2) How violent your bow is to the arrow. Slower bows impart a lower impulse force to the arrow in general, so a slower bow will flex/stress the arrow less.
3) Grain boundary strength. Wood is an isotropic material, which is to say it has different mechanical properties on different axes. An easy way to highlight this, the example of a wood wedge being used to split logs. It is EXTREMELY unusual in the materials world for a wedge made of a given material to be able to split that same material. So consider this when looking at just how great the grain crossing distance on your arrows are; woods with greater grain boundary strength can have a great deal more grain crossing and still produce a viable shaft.
Be cautious of boards which show a significant and consistent curve curve to the grain as well, as this can indicate what is called reaction wood, wood which grew under stress and will release that by bending once cut.

Not from this project, here is an example of a cedar board being planed so the grain aligns perfectly longitudinally with the shaft. Lighter weight woods tend to have weaker grain boundaries and so straight and aligned grain is more critical.
For this project I selected a less than entirely ideal 1x6x8 board with only one major blemish, a knot. It was the best available though. At 8 feet in length, I’ll easily be able to cut it in half and get twice the arrows. I paid approximately 25$ for it, and in theory it will yield 24 arrows. Keep in mind most tablesaw blades are 1/8” kerf, combined with a 3/8” blank that gives you 12 arrows per half, 24 in all. This never ends up being the case though. Why? Well, for a start, after cutting it in half, you’ll want to potentially plane an edge to ensure the grain is aligned axially with the arrow shafts. Boards sometimes come close enough that this isn’t necessary, but often the best can benefit from a little realignment. The other thing is you usually want to cut the blanks a little larger than the final round diameter.

A less than ideal maple board displaying relatively straight grain, but one unfortunate blemish (seen in the middle). This area can not become arrows.
The next step is to saw the boards into blanks. This is done on two axes, first ripping them to width, and then to height. It is worth noting here that if you’re deft, and want 5/16” diameter shafts (which is a standard size), you can double the number of arrows you get out of a board because when flipping the blank horizontally you’ll split it perfectly evenly with a 1/8” blade kerf. Both halves can then become arrows, whereas anything larger and your off-cut will end up as a stirring stick for glues/paints/etc. And this is the real crux of “cheap and easy,” because it is hard to get a tablesaw cheaply without resorting to using a buddy’s. The most entry level tablesaw on Amazon is probably this one for 263$. Not exactly ideal. A track saw can be had for about 160$ and can do the same job, but that is still a bit over the project budget. A track saw though is basically just a fancy name for a circular saw with a proprietary guide. A circular saw with a cut width guide clamped to the base can do the same job a track saw can, but with even less setup between cuts. And a circular saw, or skill saw, can be had for a mere 36$. Add another 15$ for a set of C-clamps, and are you’re in business. To be clear I’m not endorsing any of the above tools or brands, they’re simply reasonably reviewed and modestly priced options within a category on one of the largest global marketplaces. Please do your own research before selecting one of the above tools.
Setup for putting a guide (in this case a scrap piece of pine) on a circular saw can be seen at left. The guide should be firmly clamped to the saw, and the primary width of the base be on the board. Depending on the saw, the automatic blade guard may be disabled by the clamping of the guide, and if this is the case extra caution is necessary in using the saw. Firmly clamp the board to a solid surface, such as a table or workbench, align the saw, and make your cut. This can be repeated until the saw reaches the edge of the table. At this point a second board can be used, in any of a variety of clamping techniques, to hold the first and continue cutting until it is mostly expended. This is not as easy and quick a process as a tablesaw, however in the interest of budgetary and space constraints, it is much more compact to use and store and much less expensive.
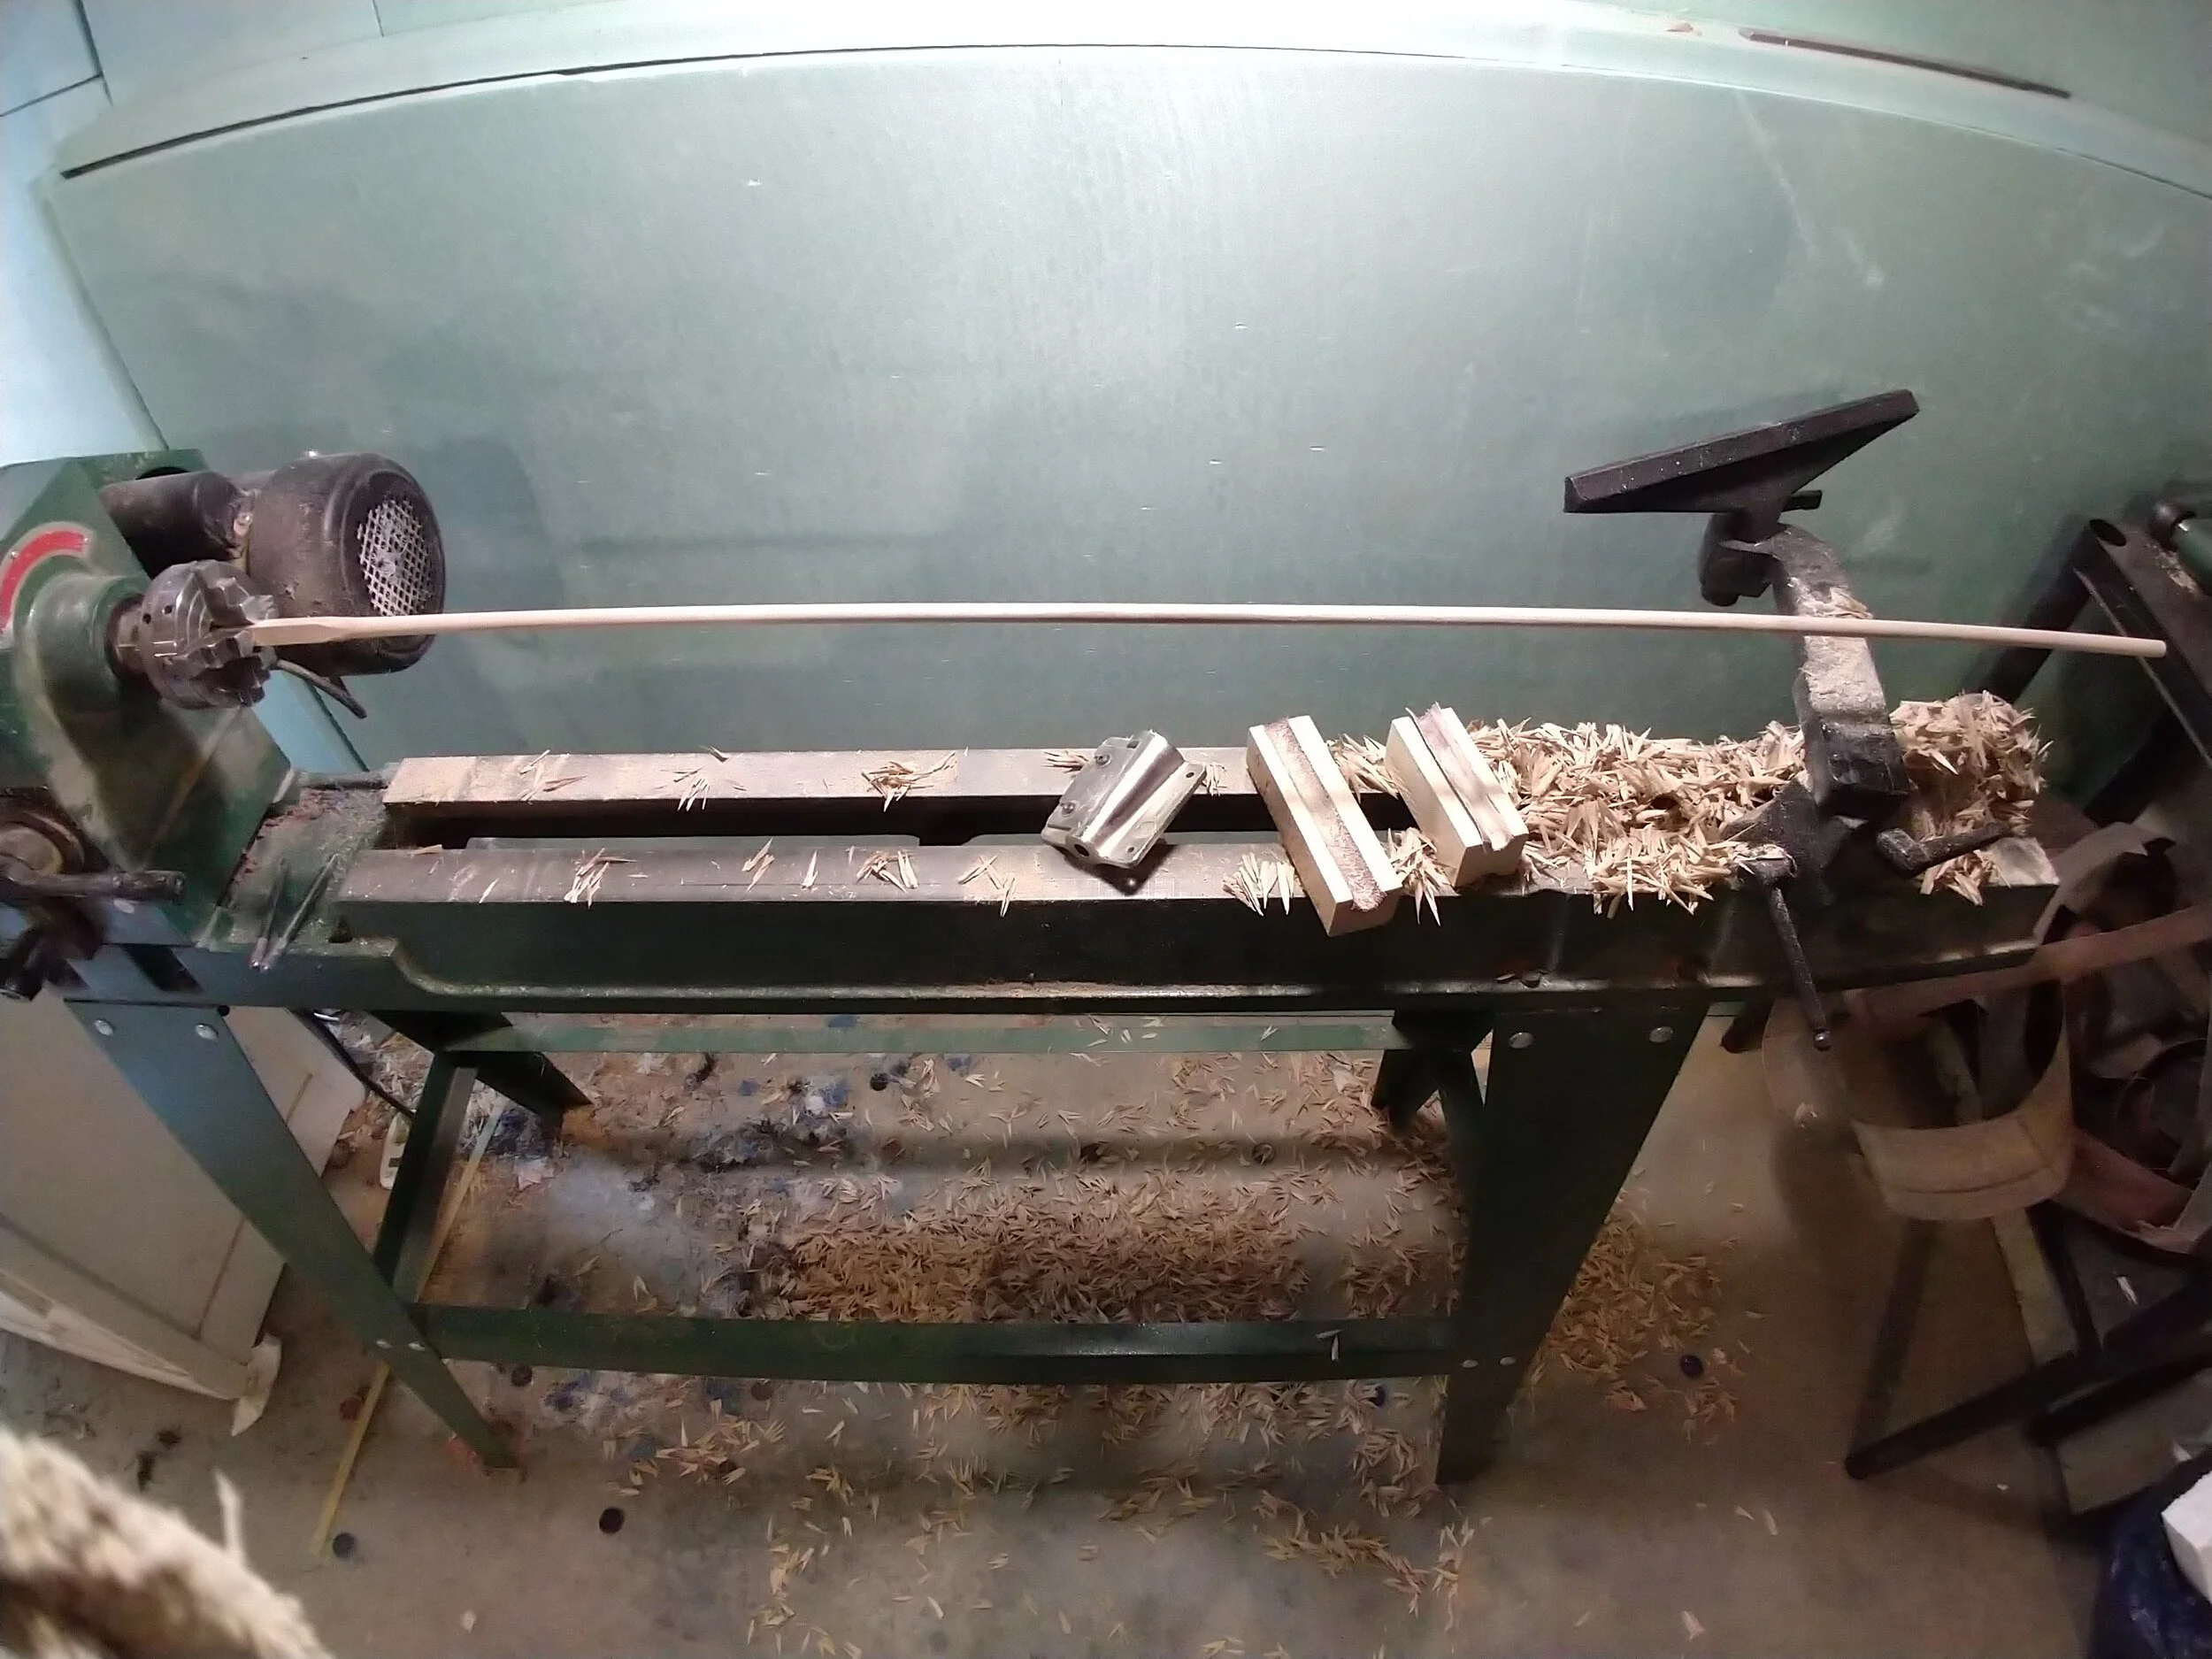
Spinning arrows round, and then sanding them smooth, on the lathe. This is a MUCH faster and easier process than using a hand plane.
Now you have long, straight, square blanks, but how to make them into arrows? This is where the magic happens! The traditional way is to use a hand plane and a jig, painstakingly planing them from four to eight to sixteen to thirty two sides and then from there sanding them round. I did that for years. The problem with it? It is absolutely agonizing. So I’m going to show you a little trick I use. The purists will argue that this is not only inauthentic, it results in arrows which require more straightening, but those of us with day jobs will appreciate you can rip out two dozen shafts in an evening like this, rather than 3 or 4. And that magic tool is a dowel cutter. There are two primary flavors, inexpensive (47$, used here), and not-inexpensive (385$). They are basically a big pencil sharpener on steroids. I’ve been running the Veritas dowel and tenon cutters for almost two decades now, since long before their doweling tool proper came out. They work great. If you have machine tools, they can also be modified to custom larger sizes, but not smaller. So if you want smaller diameter arrows, or sizes not available, you’ll need the “proper” doweling kit.

Once you have this tool though, you’ll find yourself making a lot of arrows. It really takes the pain out of the process and is incredibly fun and satisfying. This leads though to the somewhat prickly issue of how to spin the arrow blanks. This can be done on a lathe quite easily, as is shown here. Set the speed fairly low, wear heavy leather gloves, wear your face shield, and hold the blank loosely to stabilize it with one hand while you run the doweling jig up and down the shaft. Keep in mind that if you spin a shaft too fast, it can whip out of control and break. But also keep in mind that this tool will apply a not-insignificant amount of torque to the shaft, which can also cause it to break. An advantage of this is it stress tests your arrows before shooting them. This is also why heavy leather gloves and a face shield are a necessity. Once that is done, a scrap 2x4 piece drilled and with sandpaper glued in the bore makes for an equally quick and easy way to sand the shafts smooth. Really, this is another one of those tools which makes things a snap.
But what if you don’t have a lathe? Well they’re great tools, but the micro benchtop wood lathes start at about 200$, plus another 50$ for a chuck, and before you know it you’re really in for quite a lot more than that as you’ll want one with a bigger headstock, lathe tools, multiple chucks, a handful of live centers, a morse taper jacobs chuck….. the list is basically endless. It is a great tool to own, and incredibly fun to use, which is why it is worth investing in one of reasonable size and quality to start with. However this isn’t a helpful discussion about staying in budget. The alternative is an inexpensive corded drill and this socket adapter and square sockets. Given the utility of a corded drill, I genuinely would encourage you to splurge your way up to something with a keyed chuck and a little better quality in general, but this project is on a tight budget here and I’m trying to stick to it so this machine it is. Simply clamp the tenon cutter down to something, and use the drill to slowly feed the shafting through. It can then be used, if you’re so inclined, to speed the sanding process as well.
And that is it for this blog post. Next time we’ll take the raw shafting to finished arrows. That’ll be nocks, attaching points, fletching, straightening, and finishing. It sounds like a lot, but the “hard part” for those who don’t have tools is now over. It is all downhill from here.
And where do we stand on the budget? Well the original budget was 137$, the price of a dozen Gold Tip Traditionals fletched and with inserts. Against that we’ve got:
9$ points
25$ board
47$ doweling cutter
11$ Veritas sockets and adapter for dowel cutter
36$ skill saw
15$ C-clamps
21$ Corded Drill
That totals 164$. So I’ve already blown the budget. I’m also not sure where something could be trimmed out either. The big ticket items on this list are already pared down more than they should be.
**This process isn’t specific to Manchu arrows, it could be applied to any wooden arrow, however what you’ll find is that the margins on commercial wood shafting are surprisingly thin and the commercial tooling quite efficient. As a result, unless you’re making arrows for the love of it or to fit specific requirements not met by available commercial shafting, you’ll typically find minimal if any price advantage to building wooden arrows rather than buying them.